Creating a signup form
A subscriber form is one of the most effective tools for increasing your mailing list.
Attention – before creating your subscriber form it is advised to first perform the following steps:
- Define member fields – see the "defining member fields" manual.
- Create a mailing list that subscribers will be added to. See the "creating mailing group" manual.
- Create Thank you page (not required)
Once you have completed these steps you can go on to creating the subscriber form. The process has 3 steps:
1. Structural settings – setting the form as presented to the customer
2. General settings – setting up the way the form will work
3. Form Code – select the code which must be implemented in the website.
Structural Settings
Important Note! If you have implemented a regular code or a code without JS, the code must be implemented anew after every change in these settings.
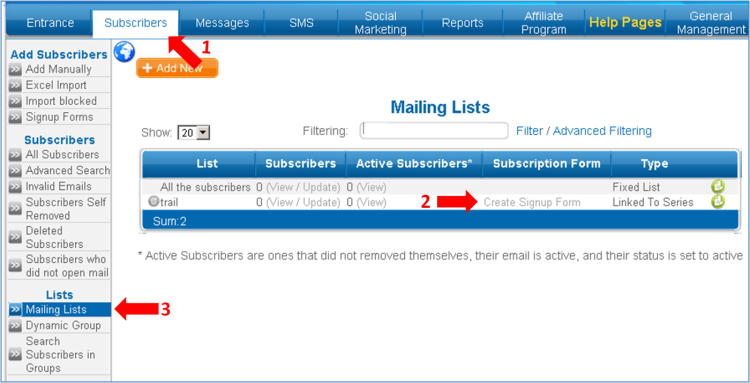
Click on the "subscriber" tab and choose the "signup forms" option and click on  . .
Another option is by clicking on the "subscriber" tab and choosing "mailing lists" and then choosing "create signup form" in the mailing lists line that you would like the subscribers to join via the form.
 1. Give the form a name. This name is internal and will not be seen by subscribers.
It is recommended to give a name that exactly describes the specific form in order to avoid confusion and disorder.
2.
a. Mark the field you would like to appear in the form.
Attention The E-mail field is a required field which automatically appears on the form and cannot be removed.
b. Mark the fields that will be required fields. Without them it will not be possible to send the form.
c. Hidden field, this is a field which cannot be seen by the subscriber, however, it places information you entered at the check box into the subscribers' details.
For example: if you would like to add a field which describes the site the subscriber came from, check the box and fill in the site name where the form is implanted.
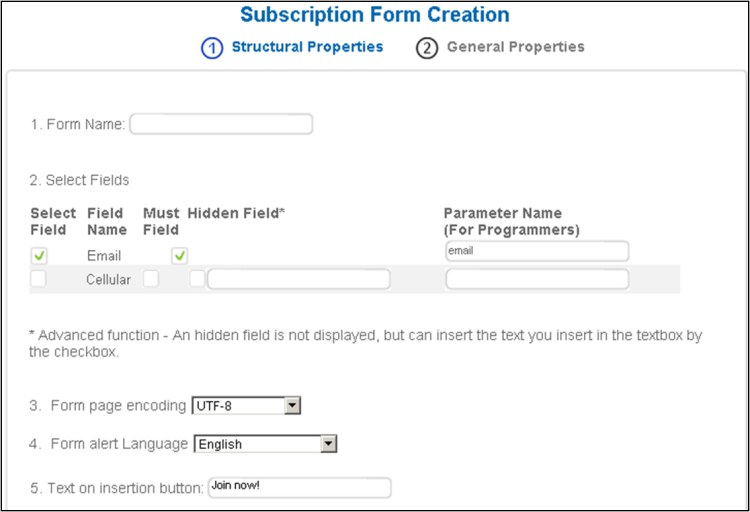 3. Choose the form coding that is relevant to your site.
Most sites use UTF-8 coding however it is recommended to be advised by the site builder.
4. Enter the caption you wish to appear on the insert details button.
The caption will greatly affect the amount of subscribers therefore it is advised that it is marketing orientated and will motivate action (motivate potential subscribers to fill out the form)
 You can design the form by clicking on "show style options" and even upload your own sign up button. You can design the form by clicking on "show style options" and even upload your own sign up button.
Click "next" to move to the general settings.
General Settings
(These settings can be changed without the need to re-implement the form)
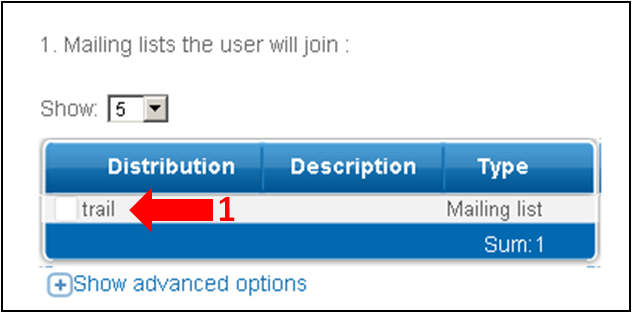
1. Choose the mailing list that the subscribers will be part of. More than one group can be chosen.
"show advanced options" – the group that members can be removed from when filling out the form can be chosen here.
2. Enter the URL of the page you want to refer your subscribers to after registration. For example your home page or thank you page that you created in advance.
Programmer options: Should you desire to view the details filled in by the subscriber in the next form, or if the page the subscriber returns to is another subscriber form, choose the "add the details the member filled in the subscription form to this address" option.

3. Should you desire to receive a notification when a subscriber fills in a form, choose the "send me an email when a subscriber fills in this form" option. Enter the email you wish to have notifications sent to in cases where the email is different from the default email.

4. You can add notes to the subscription form, such as where you implemented it.
Click on "save form" to get the form code.
Form Code
(To view the code click on the  ) )
In this page you will receive four types of Html codes:
- Recommended code –a smart code, which allows one-time implementation of the form and automatic updating of any future changes in the settings: after saving when editing fields or designing the form, the changes will be automatically updated in all areas that the form has been implemented.
- Non JS code – a simple but secure code, which is appropriate for implementing in sites which do not support JS such as Facebook and WordPress.
- Site code – a simple tabular JS code. Users of this code, attention! Unlike the recommended code any and all changes made to the structural settings of the form (fields and design), will require re-implementation of the code.
- Programmer code (redirect code) - an advanced code for programmers which allows the replacement of fields enclosed in square brackets in the user field and to redirect.
Also this code can be used at Post as shown in the ASP.NET example which can be downloaded here. In all of these options you can choose to implement the form in a tabular format (field name next to details cube) or in a column format (field name under details cube)
You can implement this code with the help of your website programmer in fan pages, Facebook, or any other web page.
The implementation of the form in a landing page in the system does not require the use of a code. To implement a form in a landing page use the "landing pages" manual.
|